Like many parents, I’ve been scrambling to get a space ready in my house for my kids to do virtual school. We don’t have a dedicated office, playroom, or any free area so I had to get creative to find a quiet spot for my son to learn for the foreseeable future. Then I got the idea to do a DIY desk with items laying around in my garage. It was cheap, easy, and is perfect for distance learning.
First and foremost, I am not handy. Sometimes I get a creative idea, but I am definitely not equipped to build furniture from scratch. I can barely hang a picture on the wall. This is important because I want you to know that if I can make this desk, so can you.
Second, your child does not need a Pinterest-perfect workspace to succeed at school at home. If you have an area that is somewhat free from distractions, feel free to set up a table or desk from your house there and make the best of it. Of course, you can buy a desk or table if you can find one. But if you don’t want to spend the extra money or worry about backorders, I’ll show you how to make a DIY desk for your child.

Pin me!
Step 1 – Find the Best Spot for Your Child to Learn
When school shut down in March 2020, my son finished his second grade year via non-traditional instruction at home. We were lucky that our school allowed him to borrow a Chromebook that we set up at the kitchen table each day for him to work. My preschool-aged daughter was always nearby and I attempted to work from home beside him, but he stuck it out and finished despite the chaos all around.
Our district is doing virtual learning for at least the first month with a much more rigorous schedule of Zoom meetings, Google Classroom, and other remote learning activities than in the spring. Therefore, he needs to be able to work in his room where he can shut the door and concentrate.
There is no room for a desk or even a card table in his bedroom, but I did identify a corner between the window and his bookshelf that looked like I could squeeze in a small workstation. The area was about 23 inches wide, so I made sure he felt that was wide enough for him. I felt much better when I found out the average school desk is 24 inches across.
I searched Amazon for a wall-mounted desk that would fit in the spot. There are some nice options there, but most were too big or too expensive for me. And I realized that a lot of them were pretty simple. So simple that I thought I should attempt a DIY desk of my own.
Here’s an example of a wall-mounted desk from Amazon that I decided to make on my own:
Step 2 – Gather the Supplies
My DIY desk idea is very simple. I want a flat surface for my son to sit at that holds his computer, paper, and pen. It needs to be sturdy enough for that purpose, but not so heavy that I can’t mount it to the wall.
I headed to the garage to see what was available. When we moved into this house nearly 10 years ago, the previous owners left some scrap plywood and other items behind. I was initially annoyed that they didn’t dispose of this before we got here, yet I have hung on to the odds and ends for nearly a decade. For such a time as this, as they say.
The drywall scrap is on the left and the plywood is on the right. I found both of these in my garage.
In addition to scrap plywood, there were also some brackets for a closet shelving system among the pile. I thought these would be perfect to mount my DIY desk to the wall. If you aren’t hoarding random homeowner leftovers, you can buy wall mounted shelf supports online at a fairly inexpensive price.
Mine look similar to this:
You can also buy a piece of plywood at Lowe’s or Home Depot and they’ll cut it to size for you. If you have a power saw and know what you are doing, cut your own piece to make a desktop.
My plywood was irregularly shaped, so I found a hand saw and trimmed it until I had straight edges. I sanded those to make them smooth. But there were some nail holes on the surface and it was slightly smaller than I wanted, so I found a piece of leftover drywall like this one to make sure I had a flat desktop.
After trimming the drywall a bit with a utility knife, I sealed the raw edges with some spackle and a putty knife. I sanded it to make it smooth and painted it white. If you have a nice piece of plywood, you don’t have to worry about all of these steps. But the drywall does make a very smooth writing surface for my DIY desk and it was super easy to paint. I didn’t think it would be sturdy enough without the plywood underneath, so I used both. But you can find the combination that works for you!
I trimmed the drywall with a sharp utility knife, then sealed the edges with spackle.
To assemble the homemade desk, you’ll need the following:
Support brackets
Desktop (plywood and drywall for me)
Screws
Stud finder
Drywall anchors, if not in the studs
Drill
Level
Painters tape
Pencil, pen, or marker
Measuring tape
Command Strips (optional)
Supplies for assembling the DIY desk.
Step 3 – Build Your DIY Desk
Once you have all the supplies, it is time to assemble the desk. The standard desk height is 30 inches, so I did my son’s about 28 inches from the ground since he is a kid. I used the stud finder to locate the studs to make sure the brackets were secure. I was more concerned about putting them into the wooden studs than making sure they were centered on the desktop, especially since my DIY desk was in a corner. If you can’t get your brackets in the studs, you need to use drywall anchors to make sure it is safe.
Then I put painter’s tape on the wall where the brackets would go. That way, I could mark the holes on the brackets easily without drawing on the wall. In full disclosure, I had my husband do the drilling because I am not very experienced and didn’t want to mess that part up. But I fully believe I could have done it, and I’m sure you can, too!
-
- Use painter’s tape to mark the studs and make it easy to see where to drill.
-
- A level will help align the second bracket after drilling the first into the wall.
We put one bracket on first and made sure it was level, then used a level to make sure the other bracket lined up. You don’t want a crooked desk! If you are using the painter’s tape, be sure to remove it before you completely attach the brackets to the wall. Trust me, it is a hassle to remove after you secure them. Learn from my mistake!
Then drill the plywood desktop to the brackets. Make sure to use screws that are shorter than the thickness of the plywood. I used heavy duty Command Strips to attach the drywall top to the plywood. You could screw that together as well, but I wanted an easy option to switch it out in case it got damaged or if I had other issues.
That’s it! Step back and admire your DIY desk!
Attach the desktop and add a chair for a simple and easy DIY desk. This was before I sealed and painted the drywall to make a smooth surface.
Step 4 – Accessorize Your Homemade School Desk
Because I had all the supplies in my garage, I spent exactly zero dollars on my DIY desk. I am very proud of myself which is why I wanted to share this easy virtual learning workspace solution with you.
For seating, I pulled a plastic folding chair out of the garage. Since his feet don’t lay flat on the ground, I put a small box under the desk to help with posture. I also have a large exercise ball he can sit on if he needs some movement during Zoom meetings.
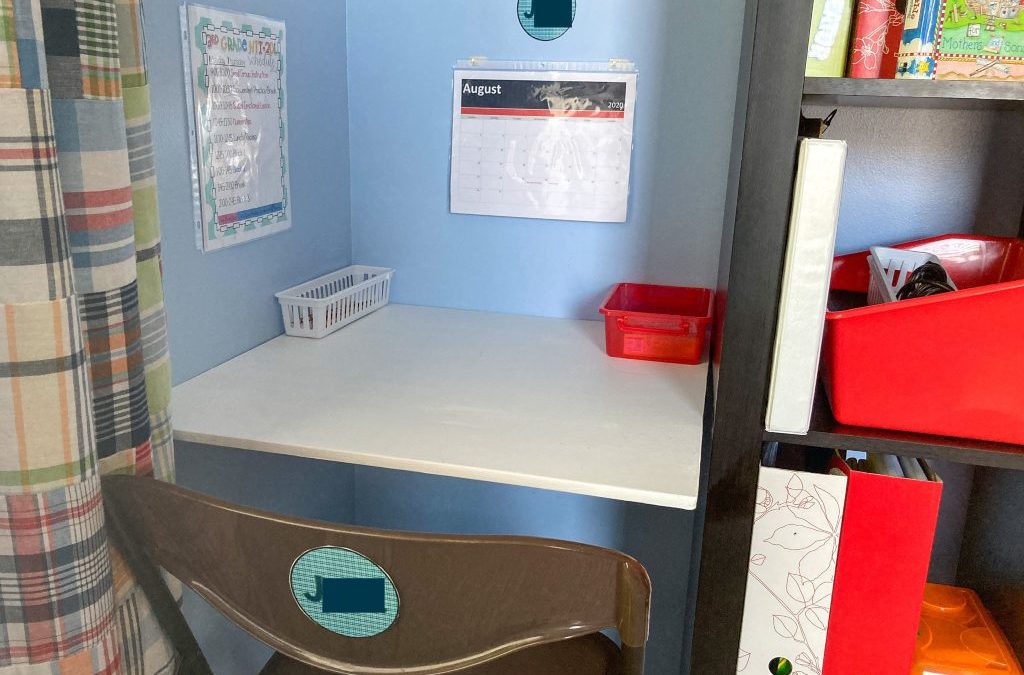
In the stacks of school papers I’ve hoarded over the years, I found several laminated name tags I had saved. He chose his favorite, which I attached to the wall and back of his chair to make it look more like the classroom. I also printed his virtual NTI schedule, slid it in a sheet protector, and attached it to the wall with a Command strip. For a calendar, I used another sheet protector and a couple of Command mini light clips to hang it up. (If you can’t tell, I love Command strips/hooks and plastic sheet protectors!)
Luckily, his DIY desk is right beside a cube shelf for easy access to his school supplies. I got magazine holders for notebooks and papers, a plastic school bin to hold his Chromebook, and used a small drawer organizer to hold a few pencils. Because I don’t want to worry about dry erase marker stains on his carpet, I also got some of these Crayola dry erase crayons to use on a small whiteboard.
Because I had almost all of these items in my house already, I spent less than $20 on the entire virtual learning workstation. That’s less than I normally spend on back-to-school supplies!
Now I feel as ready as I can be for this very abnormal 2020 school year. If you need a free first day of school sign printable, be sure to download one here. Have you made a DIY desk? I’d love to hear about it in the comments below!
My son on the first day of school at his DIY desk. Praying it goes well!
Download Your FREE PRINTABLE
As an Amazon Associate I earn from qualifying purchases.


This post contains links to third party companies. I may receive a small commission if you purchase any of these items. Please know that I only recommend and endorse products that I think will be of value to my readers.
 Hi! I'm Jessica! I help people fund adoptions, navigate parenting, save money, and enjoy the good things in life.
This is so cute! And so crafty! I feel like typical desks take up so much space and this one is so compact and looks very clean. I will definitely need to make something like this for my son. Thank you!
It’s great because you can make it to fit whatever space you have. Best of luck with your son’s school!
It’s nice of you to share this DIY desk. I know a lot of parents with kids at school wanting to save money and also feeling somewhat creative inside would benefit from reading this post.
I love a good DIY so this makes me smile. It turned out great, too!
How has homeschooling mid-pandemic, for you and your son, been?
Luckily, my son’s school and teachers make doing virtual school fairly easy on me. My preschool daughter is a different story! Don’t get me wrong, I’m happy for a safe option. But being a 4-year-old’s assistant is a challenge at times! Thanks for stopping by!
Not yet a mom but this is really worth to read since I’m torn in buying new desk table or just give some space for my workstation at home.